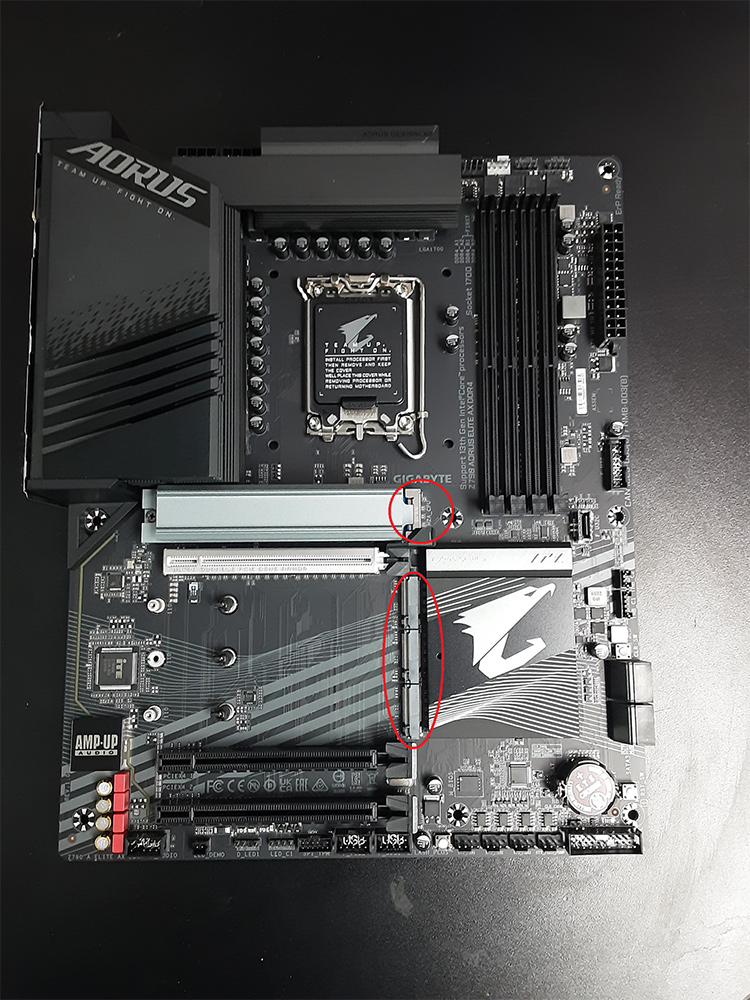

Installing an NVME m.2 SSD GuideBefore installation, it is important to note that NVMEs use PCI-E lanes which have different generations. NVMEs use Gen 3, 4, and 5. Similarly, motherboards will have corresponding generations. For optimal speeds, you should ensure that the generation of the M.2 is not higher than that of the board. Newer drives will still work in older slots but there will be a performance loss. Additionally, M.2’s will come in multiple lengths. Most consumer grade/gaming M.2 drives intended for ATX motherboards are 2280, as is the one we use in this guide. However, motherboards will often include spaces to mount different length M.2s. These lengths include 22110, 2280, 2260, 2242, 2230.If you are uncertain, the length and generation of an M.2 can be found on the packaging and/or the documentation. Motherboards will often denote the generation of a lane on the board itself, however if it is not stated; check the documentation of the motherboard.Step by step guide to installing an NVME m.2 into a motherboard
Locate the NVME slot you wish to use on the motherboard. Please note some motherboards will have several NVME slots, or have heatsinks for the M.2, some will already have hardware for mounting the M.2 installed on the board. Please refer to your motherboard’s manual for any unfamiliar deviations. See photo 1 for NVME slots.If mounting hardware isn’t already installed in the board, check the accessories that came with the motherboard for an M.2 standoff and mounting screw, or a standoff with a clip. Motherboard accessories are generally found beneath the protective packaging for the motherboard.
If present, use a screwdriver to remove the M.2 heatsink. Otherwise screw in the standoff to the corresponding M.2 length on the board. If you are unsure as to the length, check the packaging or NVME SSD manual. 2280 M.2 pictured in photo 2a
Once you have the mounting hardware installed in your chosen M.2, carefully align the drive to the slot and gently insert. If a thermal pad is present, ensure the plastic is removed See photo 3.a for correct insertion.
Gently push down on M.2 so that it is flush with the standoff, and screw or clip it in place. If you have a heatsink. Please note that some heatsinks are intended to be used to mount the m.2, and if this is the case; ensure you remove the plastic from the thermal pad on the heatsink before remounting the heatsink.It is recommended that you use a thermal pad. If one is not already present on the board, check the accessories that came with your motherboard. Before placing it on the M.2, ensure that you have removed the plastic from both sides of the thermal pad atop the M.2.
Now that the NVME has been installed, we recommend that you check your motherboard’s BIOS to ensure that the NVME is working and correctly seated before initializing it in the OS. For the BIOS of most motherboards, they can be accessed by holding delete or F2 during the bootup sequence.(picture of bios)
If necessary, navigate to the section of the BIOS that displays information for an M.2 drive and ensure that the drive is being detected in bios.If the drive does not show up in BIOS, power down your system, and attempt to reseat the M.2. If this fails, we recommend that you contact the technical support of either the supplier, motherboard manufacturer, or M.2 manufacturer.
Congratulations, you have installed your M.2 NVME SSD. You can now either install an operating system onto the drive or initialize it in the one you already use on the system.
To initialize a drive in Windows, simply right click on your start settings, and select “Disk Management.” The location of this will vary by Windows version.Then, Disk Management will request the disk be initialized. Select “Ok” to continue.Once the disk is initialized, to use it, you must create a partition. To do so, right click on your newly initialized, unallocated disk, and select “New Simple Volume”Select “Next >” to continue.The Windows Volume Wizard will use all available storage by default, so just select “Next >” to continue.Next, the Volume Wizard will assign a drive letter. You can change it if you’d like. Then select “Next >” to continue.While default settings here are fine, you can change the name of the drive “New Volume” to anything you’d like. Then select “Next >”Finally, select “Finish” to finalize your selection.With that, your new drive is usable! Thank you for reading!
Congratulations! You’ve successfully installed your M.2 NVME SSD, unlocking the potential for improved system speed and responsiveness. Whether you’re gearing up for gaming or optimizing your workflow, this upgrade will elevate your computing experience. Now, dive into the world of high-speed storage and enjoy the enhanced capabilities of your tower gaming PC, workstation desktop, or prebuilt PC. Happy computing!


