When Canon introduced the 5.2mm dual fish eye lens for shooting VR 180 video, they didn’t just ‘make a new lens.’ They had to develop an entirely new ecosystem with software capable of processing the huge 8K RAW files and then make sure they were converted to a readable codec for post-processing and editing.
In this article, we will look in depth at what it takes to post-process and edit a VR 180 video that was shot on the Canon EOS R5c ($3,999.00) and dual fish eye lens ($1,999.00). If you’d like to read about preparation for a VR 180 video shoot or how to shoot with the equipment, see the previous two articles in this series.
[Full VR 180 Series: Preparation | Shooting VR Videos | Post Processing | 3D 180 VR Images]
Developing an Efficient Post-Processing Workflow for VR Content
Shooting videos with the R5c and dual fisheye lens did not present too many issues for us. There were some major considerations to take on board, and of course, shooting a 180-degree video did present its own challenges. However, one of the major sticking points in our journey was the post-processing workflow.
Perhaps one of the biggest challenges was the sheer size of the files that we shot. A two-minute 8K RAW video file is around 50GB of info. You need a lot of storage space, a lot of RAM and GPU, and a fast computer.
In fact, I ended up updating my laptop to a faster one just to be able to process these files. My 8-year-old Mac Book Pro just wasn’t going to cut it! This is yet another major cost to take into account if you want to start making VR180 videos with the Canon system.
You can see the system requirements on the VR Utilities download page. It states that 8GB of RAM is sufficient. However, I am very grateful I went for the 32GB in the end. 16GB is, in my opinion, an absolute minimum.
In order to download the footage from the memory cards, you need to use a fast card reader. We used this one from ProGrade Digital. If you don’t use a fast, good-quality, card reader, it is much slower to offload the footage, and the possibility of corrupted files increases.
For the videos you see at the end of this post, we shot about 500 GB each of 8K RAW 60fps footage (roughly 15 minutes). Between the cobalt cards and the fast card reader, it took less than 15 minutes to offload the raw footage.
You do have to pretty much shut down all other applications on your computer while doing the download. We managed to crash an M1 Mac while offloading the cards after one shoot! Once again, the faster the computer, the better.
Software and workflow
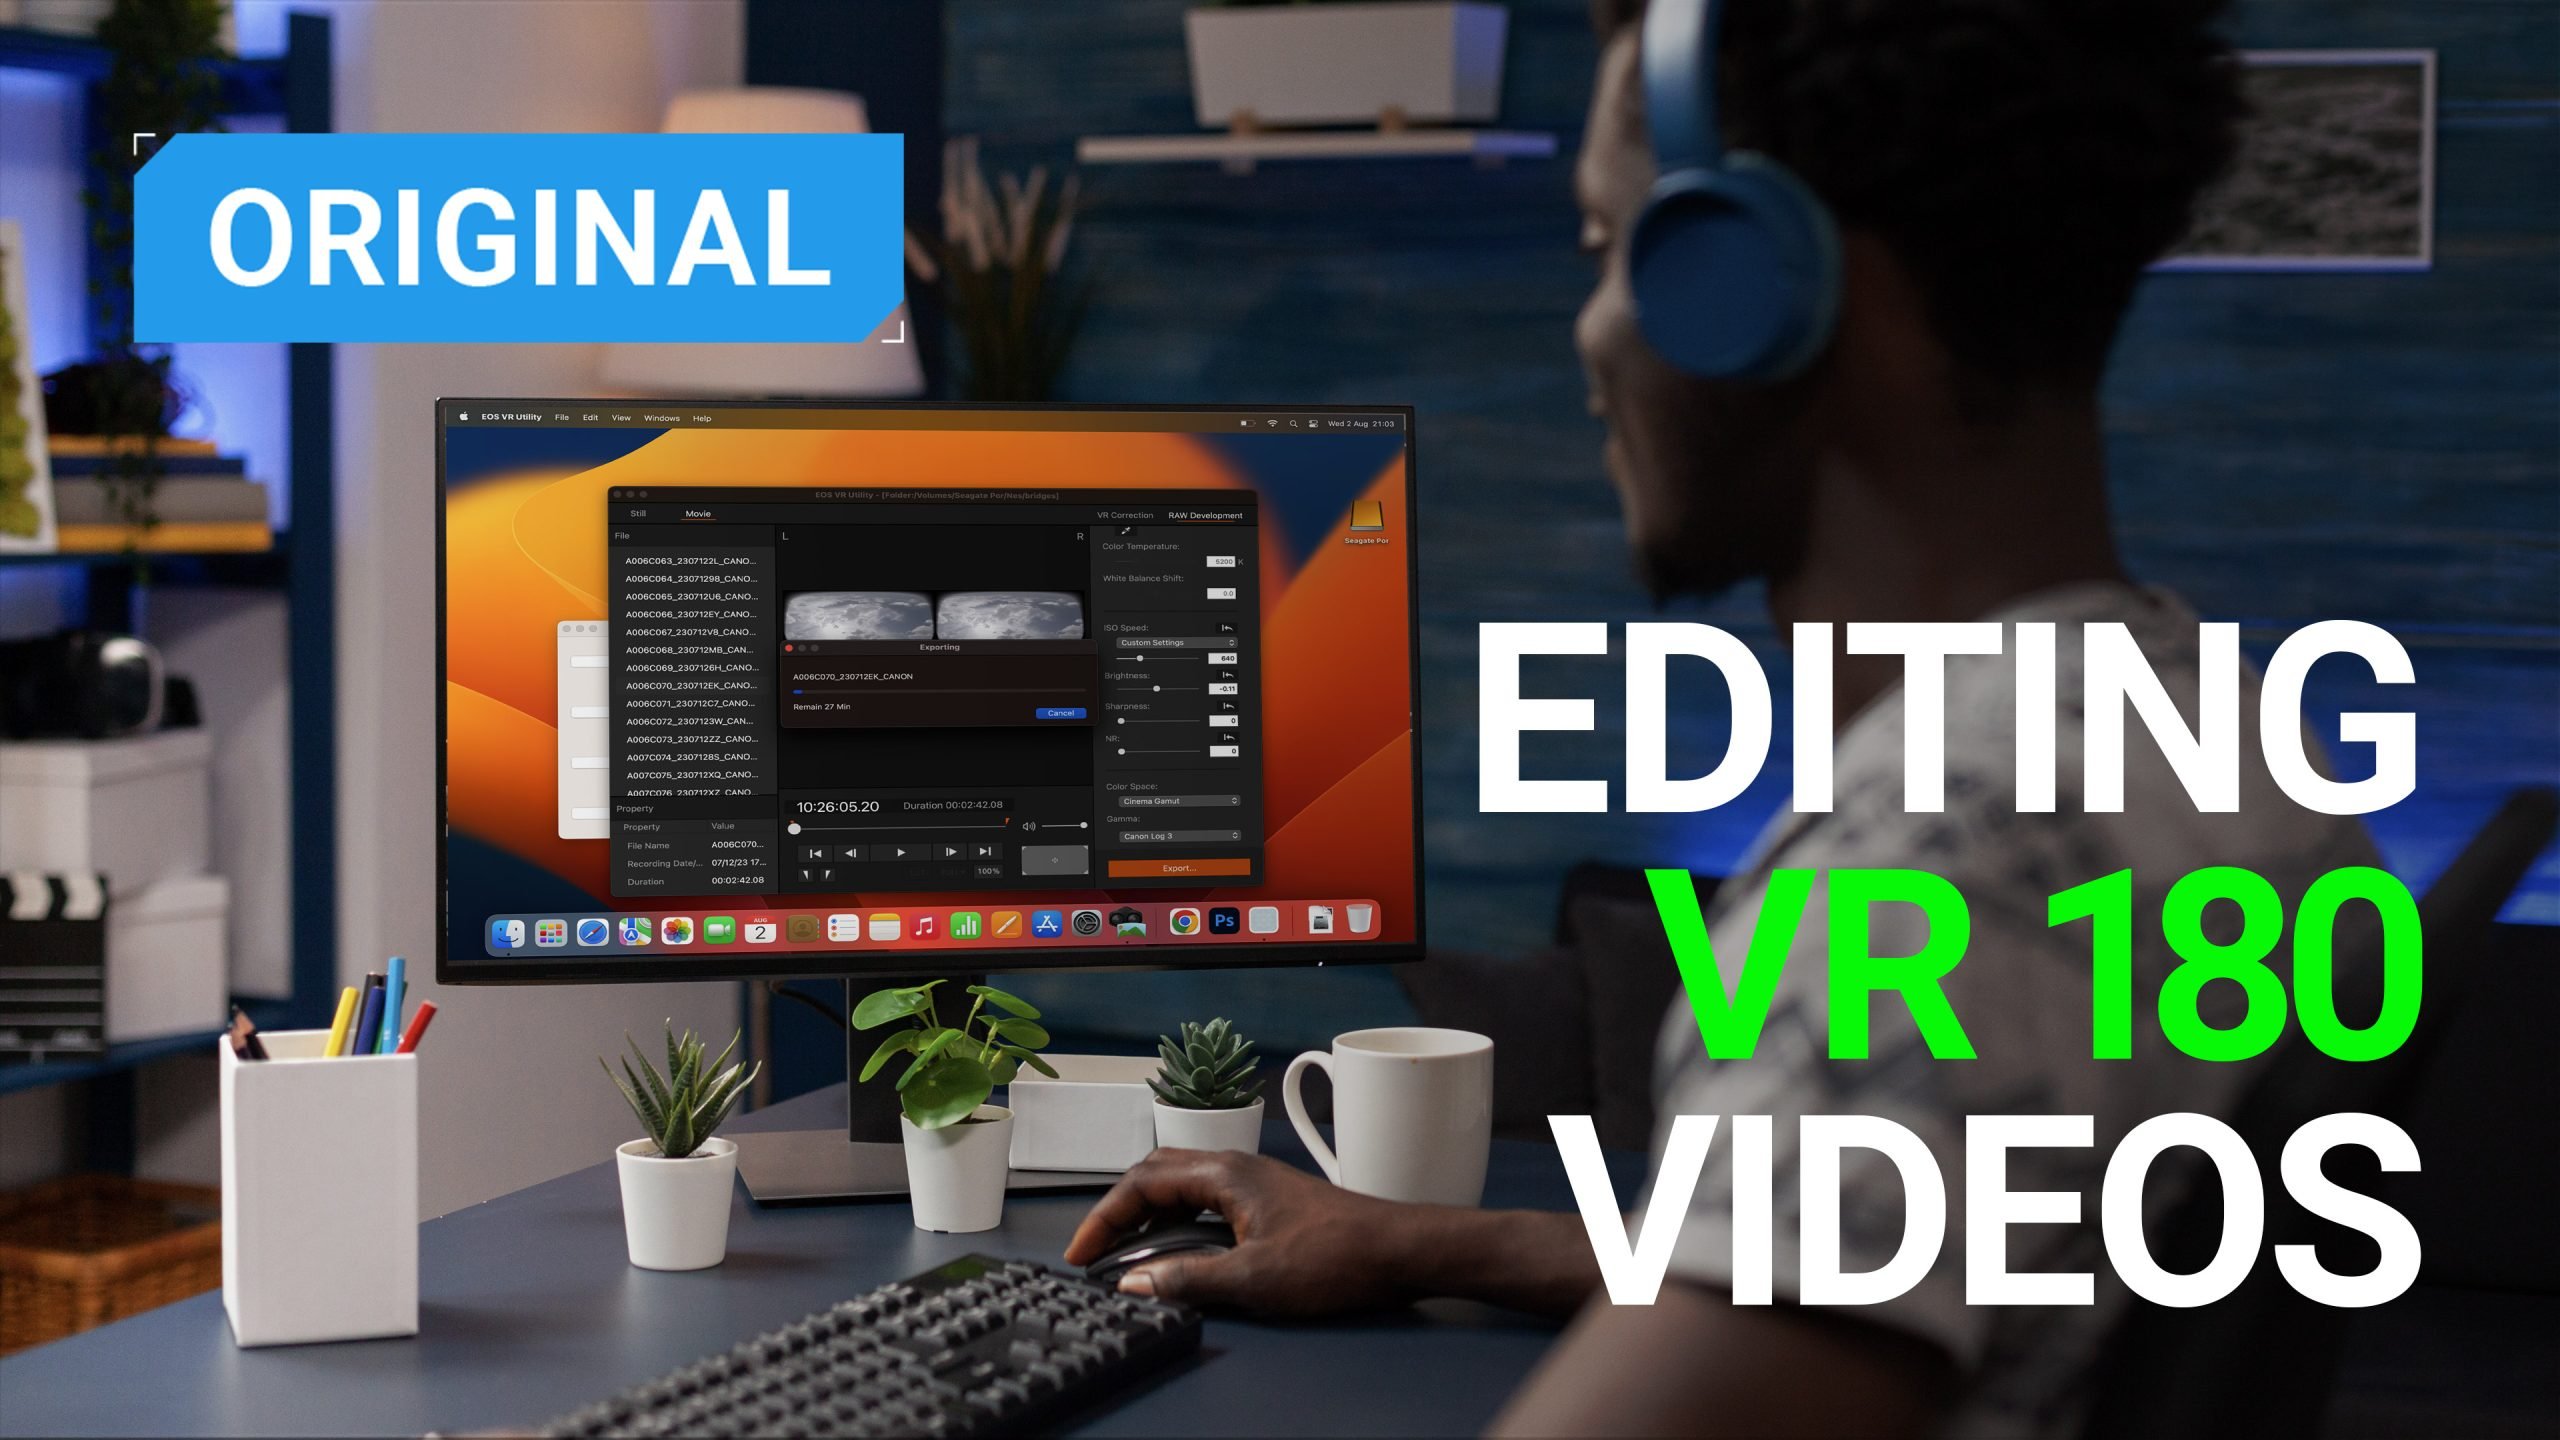
There are two major steps in the editing workflow. Firstly, you must process the RAW footage using Canon’s VR Utilities software. This software processes the VR footage automatically. It will apply distortion corrections and, most importantly, convert the circular footage into equirectangular images (square-ish in layman’s terms), ready for editing in your NLE or viewing on a headset.
It also allows you to make changes to the exposure, add sharpening and reduce noise, and in the latest update (version 1.3), it allows stabilization of your footage. This is a great advantage and will allow easier shooting with gimbals, as this video from Hugh Hou shows:
The second step is to edit the exported footage from VR Utilities into your preferred editing program. Canon has teamed up with Adobe and has created a VR Plugin for Premiere Pro. This will read the VR codecs without any extra work on your end, making it easy to edit the footage in the way you are accustomed to.
There is, of course, a catch. In order to edit clips longer than 2 minutes in length, you need to pay a subscription fee. It’s $5/month each for the VR Utilities and the EOS VR Plugin for Premiere Pro. You do get a month of free trial. You can download these here, alongside the Canon HEVC Activator for whichever camera model you are using.
If you don’t want to pay for the plugin, you can use DaVinci Resolve if you have the Studio version (the free version won’t support 8K). However, you need to be aware that there is one more step involved than in Premiere Pro.
Let’s look in-depth at the entire workflow.
As mentioned above, the first step is to download all the software and follow the instructions. After that, you can open up EOS VR Utilities. For an in-depth video on the process check out the one below:
Once you open the program, you should see your files listed in the left-hand column under either Stills or Movie. If this panel is blank, you need to go to the File drop-down in the menu and choose ‘Select Folder.’ This then allows the software to access your files. Once you find the folder you want to open, simply click Open (on a Mac).
VR Correction
The interface is fairly straightforward. You will see your selected footage in the middle of the screen. If you toggle the ‘fish eye’ option, you will see the footage change from circular to rectangular. It is quicker to keep the footage clicked to fisheye while you do any RAW adjustments, however, ultimately, we want that box unchecked.
You want to check the Parallax correction and horizontal correction and use the stabilization option if necessary.
Check the lens mask box. This prevents interference from each eye viewing the other lens in a headset.
Raw Adjustments
Now you can make your RAW adjustments, so head to the RAW development tab in the top right-hand corner. Here you can alter the white balance, the ISO and brightness, and add sharpness and noise reduction should you wish to.
You will also want to choose the colour space. Choose ‘Cinema Gamut’ and Canon Log 3 since that is what you shot the footage in.
Once that is done, you can trim the in and out points as you normally would and then hit Export. Select Apple Pro Res 4444 from the drop-down, and choose VR180 if editing in Premiere Pro. If editing in DaVinci Resolve, select the extend to 3D 360 selection. Choose maximum resolution, and hit export.
Depending on the length of the footage and the speed of your computer, the export time can vary. On my old MBP, a 2-minute 8k video exported in 9 hours, compared with 20 minutes for a 2-minute RAW 8K video on my new computer. You can see that it is worth investing in a faster computer!
That’s it! You’re now ready for your NLE.
Editing your VR 180 video
Now that you have your exported footage in a readable format, you can head to your preferred NLE for editing and exporting.
If you’ve activated the plugin for Premiere Pro, you should now be able to create a project and open the exported ProRes444 files as you normally do. From here, it’s pretty much business as usual, thanks to Canon for making the plugin.
For the music videos, we edited the videos in the same way that we would have with any other video. We synced the tracks to the audio, then cut between them to utilize the different camera angles that we had shot.
After that, it was time to add a LUT and then grade the LOG footage with our styling choices. Again, it’s all done in exactly the same way you normally would in Premiere Pro.
At the time of writing, it is not possible to edit the videos in Premiere Pro using a headset.
PRO TIP: Adding text to a 180 VR video
The only tricky part was to add the titles and end credits so that they would appear correctly in VR format when viewed in a headset. To do this, you need to go to the effects panel and select Video Effects. Open up the Immersive video tab and find ‘VR plane to Sphere’. Drag that onto your text in the timeline.
If it’s not looking correct, check that the sequence settings are correctly set to VR 180, equirectangular, side by side in the VR properties tab.
Export settings in Premiere Pro
To export, go to the export page, choose what sort of file you want (more on this later as it depends on where you’re viewing it), and scroll down to check the ‘Video is VR’ box. Here, you can make sure it is stereoscopic, side by side, and 180 degrees. Now, export your VR 180 video as you normally would.
The recent update to EOS VR Utilities means that you can now edit your VR videos in both Davinci Resolve and Final Cut Pro, and you can even edit them using a headset.
In order to edit using these programs, you need to change the export setting in VR Utilities to ‘Extend to 3D 360.’
Now, open up a new project in Davinci Resolve Studio using the correct resolution. You will see that the two images are stacked on top of each other rather than side by side.
Edit the footage as usual, and apply effects, LUTS, and color grades as you wish. Adding 3D text in Davinci Resolve is not as easy as in Premiere and requires you to use Fusion. I won’t go into that here, but here is a video tutorial in case you wish to learn how it’s done.
Then, export the video with your chosen settings. This would be the same if editing using Final Cut Pro as well.
Google VR 180 Creator
Now that you have your exported files, you need to inject them with the code for viewing the footage properly in VR 180. Premiere Pro adds this automatically; However, Davinci Resolve and Final Cut Pro don’t.
You can download the Google VR 180 Creator in these links:
Hugh Hou is keeping his own private stash of those, as Google removed it for some reason a while back when they shelved their Cardboard viewing system. Thanks Hugh!
Open up the Google VR 180 Creator, and choose ‘Prepare for Publishing’. Then you can import your clip, and choose the options ‘top/bottom’ and ‘360 field of view’. Then click export. You are now ready to upload your VR 180 video to view it on different platforms.
Exporting and uploading VR 180 videos
The exact export settings you choose will vary slightly depending on where you want your videos to be viewed. There are a few different platforms available at the moment for sharing VR videos, they all have their own advantages and disadvantages. Here are the main ones, plus the export settings they recommend.
YouTube
YouTube needs no introduction and is probably the biggest and best-known video-sharing platform there is. Anyone will be able to view your video, with one advantage being that they can view it either on a headset or on their phone or desktop (albeit without the full immersive experience). It’s also entirely free, and you have the option to monetize your videos if you’re popular enough.
Unfortunately, YouTube will only support up to 4K, which makes shooting in 8K RAW a little bit pointless. If you’re shooting on the EOS R6 mark II, however, this won’t be an issue.
Export settings: 4K, MP4 h.264 is fine.
DeoVR
DeoVR is the new kid on the block when it comes to VR sharing. You’ll find a whole community here enthusiastically pioneering VR 180 and 360 videos from all over the world. It’s a small start-up at the moment, but I suspect that DeoVR will grow from strength to strength, particularly as live VR streaming becomes more widely supported.
One advantage to this platform is that it’s free, and you can upload 8K, meaning that your 8K RAW footage won’t go to waste. There are also some subscription options and ways to make money from your content.
Export settings: 8K, MP4 (h.265 HEVC) bitrate 60-80mbps
Meta Quest TV
This is possibly the least well-known for most of us who aren’t super into VR, and you definitely need a headset to watch on this platform. That being said, it’s probably the best quality for viewing VR videos.
Export settings: Check out this guide here.
Directly via a headset
You should be able to play your VR 180 videos directly onto your headset should you own one. Instructions will vary depending on which device you have, so check out the manufacturer’s instructions. On the Oculus/Meta Quest headsets, for example, you can play your videos via a USB connection from your computer.
FAQ
How do you edit VR 180 videos? You edit these videos by first processing the RAW files in Canon’s EOS VR Utility software and then in your preferred NLE program.
Can I edit the videos with a headset? At the time of writing, you can edit wearing a headset in both Davinci Resolve Studio and Final Cut Pro. Premiere Pro does not yet support it.
Can I skip VR Utilities and edit straight in Premiere Pro? If you are shooting RAW 8K 60fps (recommended), then you need to go through VR Utilities first. If you are shooting mp4 in 4K, then you can technically edit straight away in Premiere Pro. That being said, I have found it beneficial to always go through VR utilities first to avoid problems.
Is VR Utilities free? It is free to download, however, if you wish to work on clips longer than 2 minutes, you have to pay a $5/month subscription. There is a free 1-month trial.
Which is better, Mac or PC, for VR editing? I don’t want to get into the merits of either system here. However, you will need plenty of RAM, a minimum of 16 GB but preferably more. Plenty of GPU is also a huge advantage. I have found the newer M2 chipped Macs more than capable of working with these files, and I’m sure there are plenty of great PC options as well.
Conclusion
Canon has worked not only on the hardware needed to make high-quality VR 180 videos but also on the software and post-processing end. They have streamlined the workflow to such a degree that it is really very easy and quick to edit these videos and share them online.
The VR Utilities program and Premiere Pro plugin are very much still a work in progress, and Canon is constantly working on updates and making the software more efficient and useful. The addition of image stabilisation into the software is a huge improvement, and we can look forward to more to come.
Final Thoughts
Overall, it has been a steep yet highly enjoyable learning curve, purely because of how new this VR 180 technology is. To be able to shoot in 8K RAW, handle the files and post-process everything for under $10,000 is truly remarkable.
Yes, it’s not exactly a small amount of money for most of us, and there are considerable expenses beyond buying the camera and lens. However, a few years ago, you’d be looking at a far, far larger overall spend just to produce the same quality results.
I predict that we will be seeing more and more VR 180 and 360 videos in the near future, and Canon has confirmed its commitment to the medium. By opening up more camera bodies that work with this lens, such as the R6 mark II, and a new 360/180 VR hybrid consumer camera being teased, I think it’s safe to say that this won’t be the end of VR with Canon.
And frankly, that is great news because I am completely hooked at this point!
Once again, here are the two VR 180 music videos we made:
Creating a comprehensive series like this is not trivial. We were supported by a few partners who helped us with gear. A shout-out goes out to Canon for lending DIYP the camera and lens. A big thank you to Pro Grade for supplying the incredibly fast cards. Kolari! Thanks for the filters. Adobe, cheers for the Premiere Pro licence. Blackmagic, thanks for Davinci. If you read through this part, thank you as well for allowing us to acknowledge the support we get. You know the saying, it takes a village to write a series.


